How to dye undyed yarn: Vibrant Ocean Sunset on SNOWDRIFT
Bold summer sunsets at the ocean are one of my favorite sights. The sky looks...

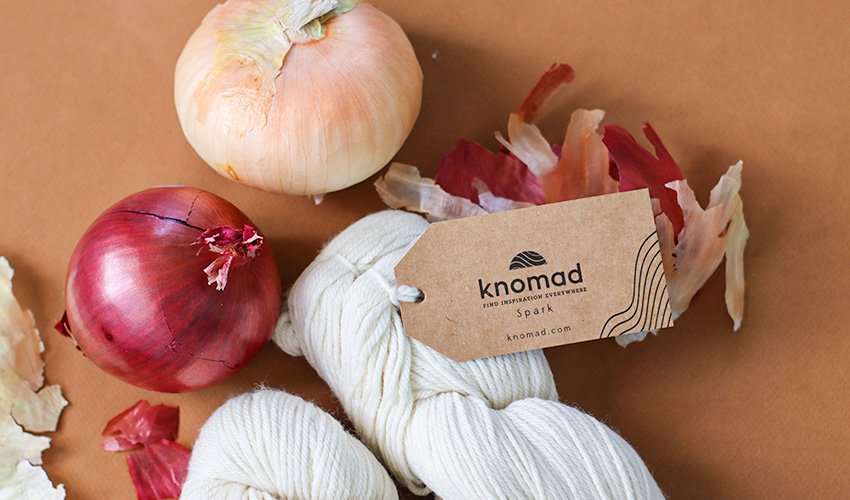
Sometimes, combining undyed wool yarns with fantastic, natural color is as simple as looking in your kitchen! Many compost-ready food castings actually contain quite a bit of natural color: avocado pits and skins, coffee and black tea, and perhaps one of the most surprising–onion skins! Yellow or red, the glossy skins from an everyday onion make one of the most concentrated and versatile natural dyes.
If you aren’t planning on making a big batch of French Onion soup, you’ll need to collect your onion skins over time. I usually plan to do 1-2 onion skin dye days a year (one in spring, one in fall) and spend the summer and winter gathering skins from each onion we cook with. You can separate out the red skins and lighter color ones into two different storage containers if you’ve got enough of them–the red skins make deeper greens and more caramel tones, while you white and yellow onion skins will lean towards brighter yellows. Usually, I don’t have enough skins of both colors to fill a full dye bath, so I combine them.
For this experiment, I used approximately ¼ weight of fibre in onion skins. This is a lower ratio than many natural dye baths, and speaks to how concentrated in color the skins actually are! While I was able to get some soft yellows and sage greens that felt very spring-like for this article, increasing your concentration can yield intense, beautiful golden yellows.
To illustrate the variety possible with our onion skins, I’ve dyed two skeins and then modified one of the skeins with iron modifier. A modifier in natural dyeing is an additive that shifts the color of the dye good in an entirely new direction. When using onion skins and adding iron, the yellows have the potential to shift into olive and sage greens.
For this dye experiment, you’ll want the following materials on hand. Remember, anything you use for natural dyeing must not be used again for food or food prep at any time, and you’ll want to store it separately to avoid any cross-contamination.
This should be big enough to hold 1-2, 100 g skeins of yarn, covered in water and fully submerged with room to move around. If you only have one, you will need to mordant the yarn overnight, strain and wash the pot, then prepare the dye in the same pot, re-wetting the yarn and adding it to the dye bath on the 3rd day of the process, instead of being able to do both the dye prep and mordanting on day 1.
This could be your at-home stove with good ventilation, a hot plate, a propane burner or even a crock pot. If you’d like to use an upcycled crock pot, you will not need the stock pot, but it will need to stay fully dedicated to natural dyeing as dyes are not food safe.
Natural dyes do use a lot of water–for prepping your fibres, creating dye baths, and rinsing finished yarns. You can use rainwater if you like, especially if you find your tap water is influencing your colors negatively. You can test your water’s pH with strips and see how ‘neutral’ it is if you like.
You’ll need this for the alum in this dye experiment, but not for the onion skins.
If you already have a baking scale, you can use it here, just make sure not to let any dyes or materials touch the scale directly. Simply use the tare function to zero-out the weight of any vessels you’re using to measure, then clean off your scale thoroughly after use.
Mordants are chemicals that bind to both the fibre and color, acting as a bridge to attach color molecules to your wool. This chemical is the safest of a handful of options and is popular with many natural dyers. It will only bind color to protein fibres, not cellulose ones–so color taken by the wool may not be taken up the same way by any blended fibres (like cotton, hemp, linen or nylon).
Cream of Tartar adds a little softness back into your bath and prevents your wool from feeling too crunchy at the end of the dyeing process.
I used a 1:4 ratio of dye material to undyed wool for this example, but increasing your ratio even to 4:4 yields a huge range of intense yellows and golds.
Iron liquid, iron water or iron modifier are all different names for the same thing–water that has particles of iron suspended in it. If you’re in a hurry, you can pick up iron powder from Botanical Colors (www.botanicalcolors.com).
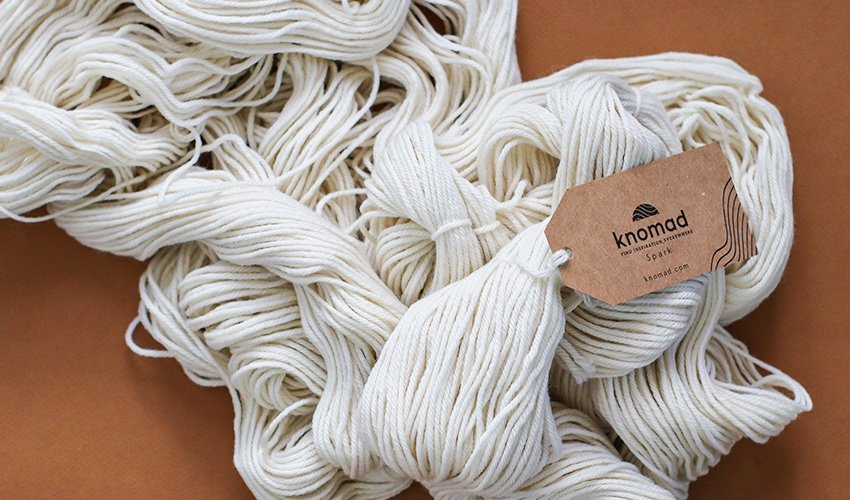
For this dye experiment, I’m using Knomad Spark, a squishy 100% Fine Organic Merino wool that takes up color in the happiest ways!
We’ll be working with iron and bright yellow dye, so it’s better to avoid surprises.
Rubber gloves or kitchen gloves, which can be re-used multiple times, are my preference here. While most natural dyes are perfectly safe to handle with your hands, you’ll be washing, rinsing, and in and out of water a lot, which can damage your nails and cuticles. Keep those knitting hands pretty and get some gloves.
*These items have been pre-calculated in the amount you need for this project, dyeing 200 g of wool, however, you’ll find what you need to do your own calculations using the mordanting guide below.

Step 1: Making the iron mordant will take the longest, so if you’d like to get started sooner rather than later, consider substituting a pre-prepared iron powder (ferrous sulfate). Otherwise, you can create your own iron modifier by sticking some rusty metal things in a jar and covering those items with about ⅔ water and ⅓ white vinegar. You’ll leave this for a couple of weeks until the water looks dark orange or there is a lot of orange sediment at the bottom.
Step 2: Prep your fibre. Knomad pre-scours and washes their yarns before shipping them to us, so there should be no need to heavily clean the fibres–simply remove the tags, leaving all the ties, and open the hank into a big loop. Add reinforcement ties if you feel they’re necessary, and soak the fibre in warm water for an hour to get it fully saturated (typically 1 hour).
Step 3: Measure the alum. Wearing a respirator or face mask, measure out 12% of your weight of fibre (WOF) in alum sulfate. Here’s the math for our experiment:
200 x 0.12 = 24 g of aluminum sulfate
Hot tip: weigh out how much alum is in a tablespoon (dedicated tablespoon) and then calculate moving forward about how many tablespoons you’ll need to simplify future measuring.
Step 4: Add hot water to your alum in a small mixing container. I like to use empty, recycle-ready plastic containers. Stir the alum and water mixture until the alum is fully dissolved and the water looks cloudy or clear, but has no visible grains in the bottom of the container. Measure out 1 tbsp of Cream of Tartar and dissolve it into the water while it’s still warm.
Step 5: Transfer your mordanting solution to a larger stock pot, and fill with enough water to cover your skeins of yarn (don’t add them until the pot has all the water in it). Stir and then add your yarn, moving it around to let it fully absorb the mordanting solution. Set on low heat and simmer (do not boil) for 1 hour. Allow to cool overnight with the yarn in the solution.
If you have only one pot, you’ll need to wait until tomorrow to do this step. If you are using more than one pot, you can prepare the dye bath the same day that you mordant as follows.
Step 6: Create your dye bath.
Onion skins are pretty easy! Measure them dried, then cover with water and boil for an hour to watch the color emerge. The water could be any shade from a clear, crisp yellow to a deep reddish-orange, depending on which color of skins you’re using.

Step 7: On the day you are ready to dye, strain your dye bath into a cookpot, removing any skins and throwing them away in the trash or compost bin.
Step 8: Prepare the yarn. Drain the water from your yarn soak, and push a little of the extra retained water out with your fingers. Not too much–liquid being held by the fibre will help draw the dye into the yarn, so we don’t want to take it all out and risk too much splotchiness in the final fibre. Add your yarns genty to the dye bath, making sure that yarn has enough room to move around but is mostly submerged in the pot. If you need more water, it’s okay to add some here.
Step 9: Place your pot on the heat source of your choice and increase the temperature gradually to a heat just under simmering. If you have a thermometer, you’re going to first lift the temperature to 90 F (32 C), stir, and then lift the temperature again to 180 F (82 C). I don’t have a thermometer, so I just eyeball it, and that’s okay too. You want the water hot enough for steam to be rising off it, but not so hot that it’s bubbling, boiling, or moving your yarn around for you. Keep the dye bath at this temperature for an hour, stirring occasionally to move the fibres around and keep them from collecting dye only on one side. After an hour, turn the heat off and let it cool.
Step 10: Lift a bit of your yarn from the pot and evaluate the color–with onion skins it can develop quickly and strengthen slightly as it cools. If you like the color as-is, remove the yarn from the pot and move to the next step. If you would like to see the color deepen or strengthen a bit, leave it in the pot overnight, stirring one more time before you go to bed.
Step 11 (Optional): If you’d like to shift one (or both) of your hanks’ ending colors, it’s easy with a bit of iron to get sage green. Add some to the dye bath, then add your yarn back in after stirring and make sure it gets fully saturated with the modified dye bath. You should see greenish tones begin to develop within 30 minutes to 1 hour, at which point you can take this yarn out and rinse. Make sure not to touch your iron-modified yarns to any non-modified yarns until they are fully dry, or you risk transferring iron to your brighter colors!
Step 12: Remove your yarns from the dye bath and smoosh out some of the extra dye–set the wool aside. Fill a sink, basin or bucket with room temperature water and add your yarn, moving it around with your hands to allow dye release. When the water is dark, drain it and do this step again. Rinse until the water is mostly clear to ensure that no dye particles will transfer to hands or clothing while working with the finished yarns. If you want, you can add a little bit of wool wash to one of these rinse baths to improve the softness and scent of your finished yarn.
Step 13: Hang your hanks of yarn to dry out of the direct sun (I like to use a portable hanging rack in the bathtub). They will drip a little bit, so if you need to dry them indoors, I suggest putting them in a bathtub or in a room with a drain (like a basement). Depending on your humidity and weather, it can take 1-2 days for yarn to fully dry, but maneuvering it so that the same part of the hank is not always hanging down can help move this process along a bit.
I hope you enjoyed this little tutorial for dyeing with onion skins! The steps are basic and can be used to experiment with other kitchen cast-offs, like avocado pits and peels, coffee grounds, and red cabbage!

Tags: Natural dyes, spark